A faucet leak is not only annoying, but these drops add up. Fixing your leaky faucet can protect our environment.
The good news is that you don’t need to be an expert plumber to fix that annoying drip.
In fact, fixing a leaky faucet handle is something most homeowners can do themselves with the right guidance and tools.
Whether bathroom faucet or kitchen faucet handle, this guide will walk you through this easy plumbing fix.
What's In This Guide?
How to Fix a Leaky Faucet: 9 Steps You Can Do Yourself
We’ve broken down this step-by-step guide into 9 simple steps a homeowner can do to fix a leaky faucet, including identifying the faucet type and different issues.
Before you get started, be sure to collect some tools. You’ll need
A screwdriver, including one flathead to pry off any decorated screw caps
Depending on what you need to fix, you may need to be prepared with faucet identification information like manufacturer information if you need to purchase a new O-ring.
Connect with an expert plumber in your local area to tackle any job – big or small. Find help with leaks, clogs, or full installations.
Select your service category on the form, provide your details, and an expert plumber will be in touch!
Plumbing Navigator is an informational site that connects visitors with local plumbers but does not directly provide plumbing services or operate as a licensed company.
Step 1: Shut Off The Water Supply
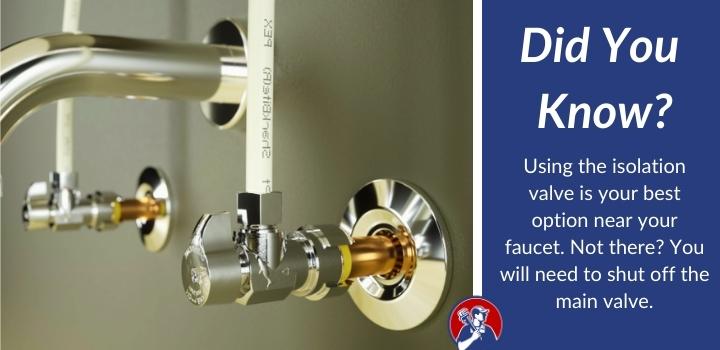
Even for minor faucet repairs, you need to remove the water from your pipes. Your home’s primary water shutoff valve should be located somewhere close to the point of entry for your house’s water line, often found in a cellar or utility room.
If you can’t find it there, check an outside wall by the supply line or near your water meter.
Many faucets have individual shut-off valves underneath them that can be used to turn off the water by hand or with an adjustable wrench.
Make sure you shut off the cold water and hot water.
Pro Tip: Using the isolation valve is your best option. If you need to shut off the main valve, make sure you have some bottled water as a reserve. In case the repairs take longer than expected, or you need to call in a plumber.
Step 2: Drain Remaining Water From the Pipes
After shutting off the water supply, open both the hot and cold sides of your faucet to drain the line.
FYI: Keep a bucket and towel handy to catch any leaks.
Step 3: Identify Your Faucet Handle Type
The initial step is figuring out the type of handle you’re dealing with as different handles have their own internal mechanisms and require different repair methods.
You also need to determine if it has a removable lever type or a fixed handle base.
A removable lever usually comes with an Allen wrench compatible handle set screw, while other types may require the use of a small flathead screwdriver or Phillips screwdriver for detachment.
Faucets typically come in two varieties: single-handle faucets, which use cartridges or ball valves, and two-handle faucets, which usually use compression valves or ceramic disks.
If turning the handle in one direction opens the water flow and turning it in the opposite direction shuts it off, then you’re probably dealing with a compression faucet.
On the other hand, if the handle controls both the temperature and flow rate in either direction, you likely have a single-handle faucet.
For those who live in cold climates, your outdoor spigot needs some special care. Consider one of these freeze-proof outdoor faucets.
Step 4: Remove the Screws and Leaky Faucet Handle Detachment
We understand that some kitchen faucets might seem more complex. For example, the touch kitchen faucet might have more components to it. Low-profile faucets might have smaller components too.
There is still a way to fix it.
If your dripping faucet features a decorative cap concealing the handle screw, carefully pry it off using the edge of your flathead screwdriver.
Once exposed, use either your Allen wrench or Phillips head (whichever fits) to loosen and extract the concealed handle set-screw.
Pull off the handle from its stem post and remove all screws. You might need pliers but be gentle so as not to cause additional damage.
If you are struggling to reassemble the faucet, don’t get frustrated.
We’ve provided steps for fixing the most common issues, such as replacing the O-ring and faucet cartridge.
Step 6: Replace the O-Ring
Always replace the O-ring. It’s often this tiny piece that is responsible for your leaking faucet.
You’ll need an Allen wrench or Phillips screwdriver to handle set screw removal and a small flathead screwdriver to pry out the old ring from its position.
Once removed, apply heat-proof plumber’s grease to the new O-ring before placing it back into the groove.
This lubrication ensures smooth operation when turning the handle(s).
Step 7: Fix the Leaky Faucet By Replacing The Faucet Cartridge
So, how to fix a faucet leaking from the stem? It might take a bit more than replacing the O-rings.
If the new O-rings don’t stop the leak, or the faucet body looks damaged, you need to replace the cartridge.
Since you already have the cartridge removed, this part is easy.
Write down this information: faucet manufacturer and model number. Bring this info along with the old cartridge to your local hardware store and get a replacement.
Different brands use different types of cartridges. The more common your faucet brand is, the easier it will be to find a replacement kit for it.
Carefully reinstall the new cartridge. Make sure you replace the new O-rings and carefully align the cartridge within the faucet body.
Step 8: Faucet Body Reassembly
The first step is reinstalling the top cap assembly back onto the stem of your dripping faucet.
Utilize a small flathead screwdriver for this task; slide this part into its initial position with care so as not to damage other elements.
Locate and tighten up the handle set screw using an Allen wrench or Phillips screwdriver.
Be careful not to over-tighten as doing so can lead to future leaks by damaging the valve stem or the cartridge.
Step 9: Testing for Leaks
The final step in fixing a leaky faucet handle is testing to ensure the problem has been resolved. Here’s how you can do this effectively.
Gradually restore your water supply. Doing so gradually prevents any sudden pressure surges that could cause additional issues with your leaking faucet.
Watch for any water leaks.
If there are no visible leaks, great. But keep watching for a few days, as some leaks can occur after a few days.
Another common problem with a faucet is the aerator. Replacing these will improve water pressure and flow. Here’s how to remove a recessed aerator.
How To Fix A Leaky Faucet Handle: Final Thoughts
Identifying the type of faucet handle.
Turn off the water.
Remove the handle from the faucet stem using a screwdriver or other appropriate tool.
Replace the O-rings.
Reassemble.
Test.
A relatively simple DIY. Congrats, you’ve taken another step along the road of “plumbing self-sufficiency.”
But, if you’re still having difficulty with that leaky faucet handle, it might be time to call in a pro. No matter how handy we are, we still need help at times.
If you want to save water, and money, and gain some handy skills along the way!
Need Local Help?
Get Fast, Local Plumbing Service
Connect with an expert plumber in your local area to tackle any job – big or small. Find help with leaks, clogs, or full installations.
Select your service category on the form, provide your details, and an expert plumber will be in touch!
Plumbing Navigator is an informational site that connects visitors with local plumbers but does not directly provide plumbing services or operate as a licensed company.
FAQs in Relation to How to Fix a Leaky Faucet Handle
How do I fix a leaky faucet handle?
The journey to fixing a dripping faucet, such as your typical kitchen faucets or bathroom sink fixtures, starts with identifying its type. Once you’ve done that, ensure safety and stop further leakage by shutting off the water supply.
This uncovers the handle set screw which can be loosened and then completely removed for better access.
Why is my bathroom sink faucet handle leaking?
A leading cause behind this issue could be deteriorated parts within your fixture like O-rings or neoprene seals. A worn-out seal may fail at providing enough resistance against water pressure resulting in leaks around handles’ base areas.
How do you fix a spinning faucet handle?
A loose lever can sometimes be fixed by tightening any loose connections.
Meet Your Plumbing Navigator
About Plumbing Navigator
We’re passionate about all things plumbing, and love sharing tips, “how-to”, and reviewing the latest products to help make your project a success!
Learn More Plumbing Tips
Want to tackle more plumbing projects? Check out these helpful guides!
Got Plumbing Questions? Search For In-Depth Answers Below!
About Plumbing Navigator
We write about "all things plumbing," helping you navigate common questions, repairs, and the best plumbing products on the market.
About Plumbing Navigator
We write about “all things plumbing,” helping you navigate common questions, repairs, and the best plumbing products on the market.